Adventure In a Box: Day 0 Essential Bike Touring Gear (bow n’ arrow, chess board, ect..)
We’re very pleased to bring you a new Field Trip installment from beautiful Maui. We sent Ryan Worcester a Weekender and he will be taking us along on his adventure around the island. He’ll be handling both the typing and camera work. We would be stoked if you read this and got inspired to buy a Fairdale, but to be entirely honest, we’d be even happier if we inspired you to get out there and take your own adventure. Ryan is a master of making do with what’s available and he’ll show us all how to travel without the stress of overthinking and over planning. Read on and enjoy the amazing images…
Adventure In a Box by Ryan Worcester
Day Zero.
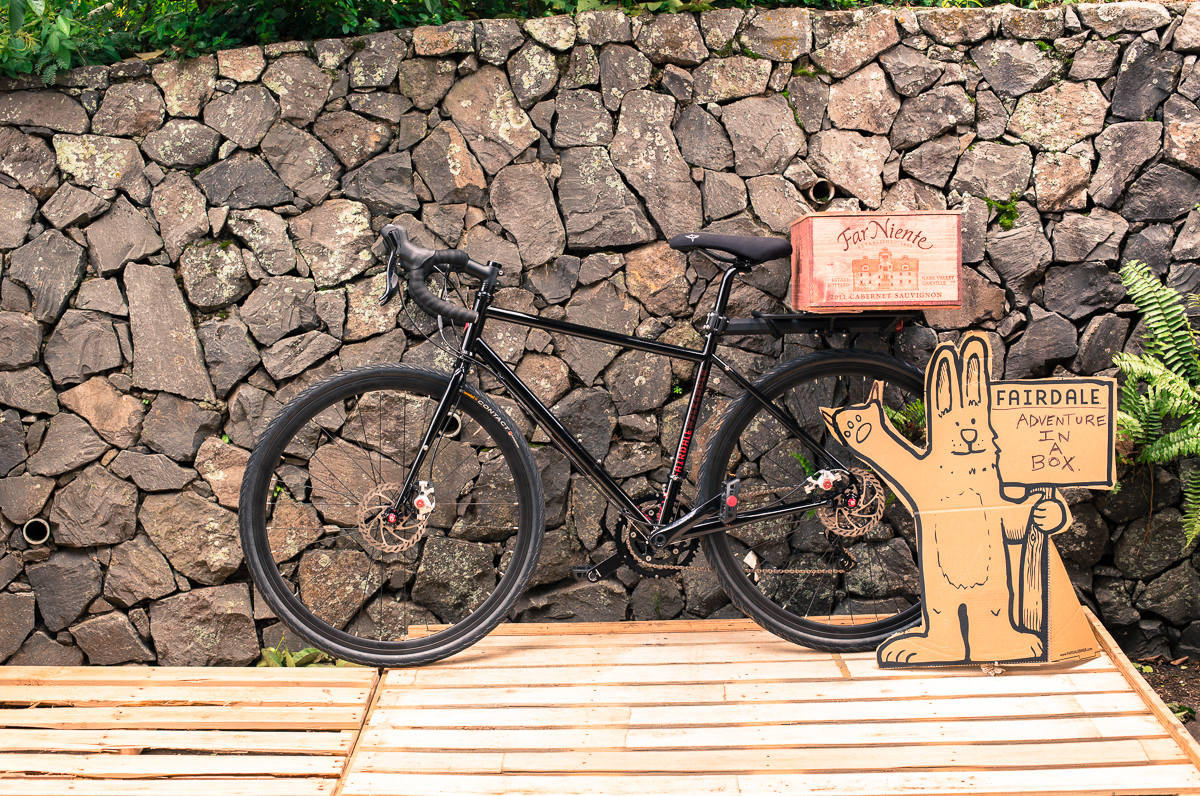
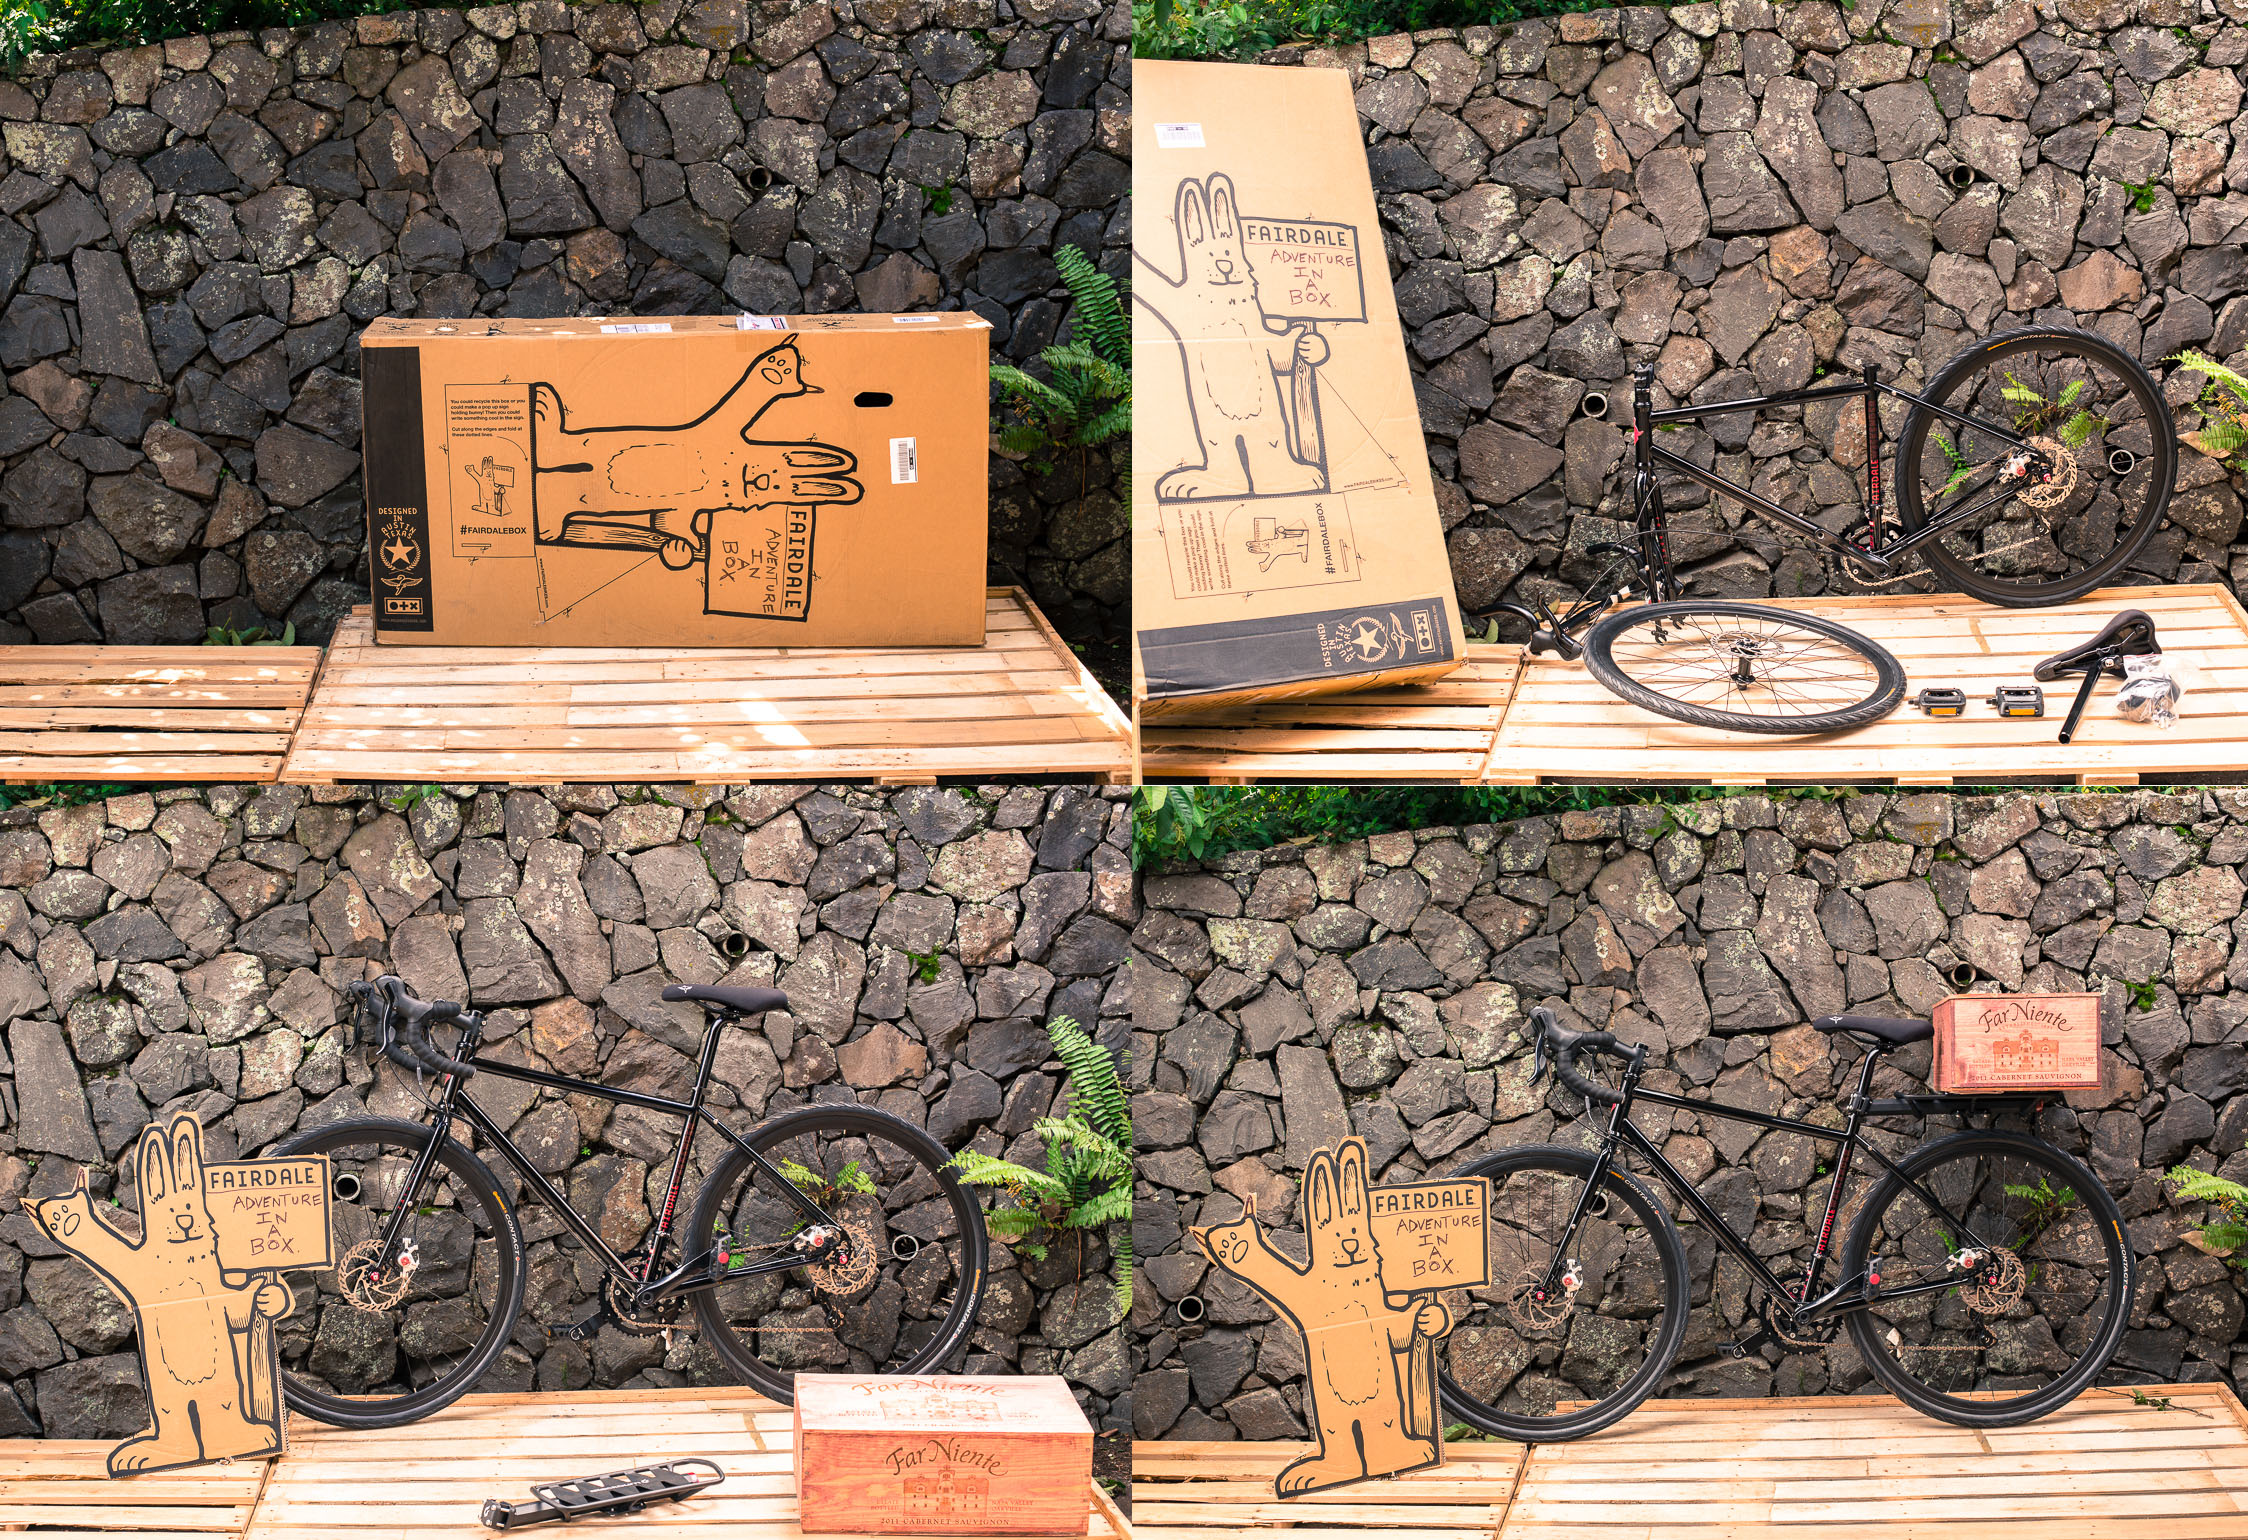
Everything starts somewhere, especially something that in hindsight you’d call an adventure. This particular journey started with a box. Two of them to be exact. The first one came in the form of a cardboard box (with the graphic of an animal that had the desire to say something important). Inside this box from Fairdale was a drop bar Weekender, and coupled with it came an opportunity to spend five days pedaling around Maui, Hawaii. An endeavor like this requires some supplies, hence the second box.
Adventure in a box (well two).
Adventure in a box (well two).
First things first, the bike had to be built. Pretty simple procedure, and gives you some time to get to know the bike. I was impressed with how well suited this bike was for what I was about to do, looked great, fit great and had really nice geometry for this kind of bike. After the obligatory first ride with some wrenches in your pocket to adjust this, tighten that etc. it was time to focus on the cargo.
Every trip, however short, has with it a unique set of challenges, and supplies needed. As for the supplies, I think that living in today’s bright lights and flashing advertisement fear driven marketing escapade, it’s easy to think there are a million things that you absolutely need to have to go on an adventure. So we buy a bunch of things to do whatever it is that you want to do, then head out to do it stuffed to the gills with whatever they convince us that we absolutely need to do xyz, or we will suffer, or die, or we won’t fit in, or whatever angle it is they use, to make you think you can’t do something unless it is this way. Some of these things you buy can be incredibly useful. To go on a bike trip like this, a bike is obviously needed, and you could do a lot worse than the Fairdale Weekender in that department. As much as it would have been comforting to have high end waterproof saddlebags, and all the latest gear, gadgets and gizmos for a ride like this it would have probably cost me a couple thousand dollars I don’t have. So I was back to the “make the most of what you have” Plan B that usually turns out to be more entertaining anyway, and usually acts as proof that if you put some work in, there is always another way. I say that because I’d hate to see someone not do something like this or something else they really wanted to do because they didn’t have the means to do so. Anyway, I decided to trust the cargo to a seat post mounted bike rack. The aforementioned cargo box is a wine box that was given to me by a man named Gregory, who’s a type of priorities in order cyclist owning a bike that more than likely is worth more than his car, always positive, and riding whenever possible. After thanking him for the box, it was time to get to work on it. I first reinforced the bottom of the box with an additional piece of plywood to address something I thought could go wrong before it did go wrong. Expoy was applied to the seams to ensure they wouldn’t rattle apart. I put a couple brackets I had laying around on the lid to reinforce the weak lid seam, and stained the box, then bolted it to the rack with hardware. Hinges have been put on the lid, and once installed the box adjusted for rider position and height so as when the lid hinges open it rests flat on the seat, and can be used as a cutting board, to organize gear, or whatever. To top it off I painted a chessboard on the inside of the lid. Time to pack.
The kit to fit the wine box.
The kit to fit the wine box.
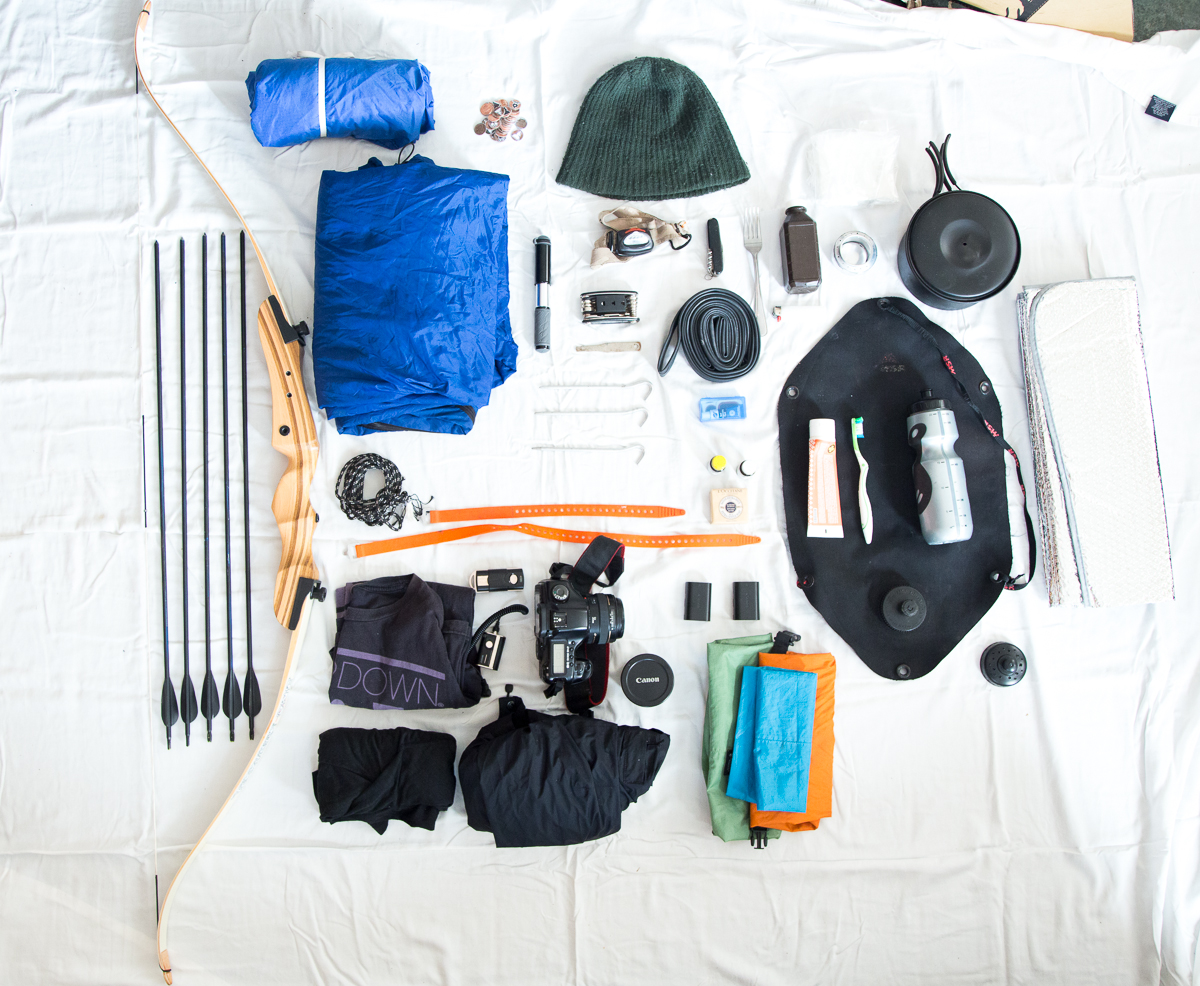
Packing for any trip is a triple Venn diagram of what you want to bring, what you need to bring, and what you are willing to carry. For this trip my cargo from left to right as pictured is:
1: Bow: Lightweight three piece take down recurve bow. Possibly one of the most superfluous items I’ve ever brought on a bike ride, but it sounded like a good idea, and if you can’t laugh at yourself whom can you laugh at?
2: Arrows for bow. The end of the rack has been drilled out to act as a quiver for the arrows, which rest up against the seat post buffered by a piece of padding, and tensioned in place via a recycled tube.
3: Rain fly. 9’x10.’ This came into my possession years ago when I was fighting forest fires for the U.S. forest service. Thanks Uncle Sam!
4: Synthetic sleeping bag. Cheap and very thin, even for Hawaii, depending on location. The plan is to augment this with a hat and shirt if needed.
5: Accessory cord. Useful for a lot of things, including setting up a tarp as shelter in different configurations if needed.
6: Extra cotton t-shirt. They say cotton kills and I’m ready to party.
7: Long sleeve half zip thin base layer.
8: Rain shell.
9: Pennies, with cut out chess piece shapes taped to them for an idea of how to have small (almost free) packable chess pieces that wont blow away, to pair up with the chessboard painted on the wine box.
10: mini pump with hose. I strongly recommend these small style pumps that have a short flexible hose to connect to the valve. They put less stress on the valve stem and are way easier to use. You can you without a lot on a bike trip, but it takes a pretty big cowboy to not take a pump. Flats happen.
11: Tubes. Two tubes.
12: Patch kit. Patching tubes is less wasteful, costs less, and you don’t have to take your wheel off.
13: Hat. Head warm and padding for the camera.
14: Headlamp. Dark happens.
15: Multi tool. I was at a bike event years ago and some car company was handing these out, I’m assuming in hopes it would make people who ride bikes like their cars. Kind of funny isn’t it?
16: single tire lever
17: Aluminum tent stakes, for setting up shelter and for using as cook pot stand.
18: Two Voile straps. If you aren’t coming from a ski background, there is a good chance you’ve never heard of these. They are a simple, light, strong, cam strap with a little elasticity that can be used for almost anything.
19: pocket knife, Swiss army style. I kind of hate these knifes, given their small main blade size, but the last flight I was on I forgot my main pocket knife was in the waist belt of my daypack and was assimilated by TSA. Whoops. I’m an idiot, and have been managing since.
20: Iodine tablets with ascorbic acid (vitamin C) neutralizer. Water treatment or filtration isn’t nearly as big a concern on a pavement based bicycle tour compared to some other trips but are a good backup, and light enough to be worth the insurance to avoid brain splitting dehydration headaches because you are afraid to drink the water.
21: Soap. No explanation needed. I hope.
22: Camera kit: Camera with two lenses, two batteries, and cheap wireless shutter release to shoot some photos on a solo bike trip.
23: Three dry bags. One to keep my sleeping bag in a plastic bag dry at all costs., others for important (IE camera) gear dry.
24: Fork. Chosen because handle is good shape to use as second tire lever.
25: home made DIY camp stove made midnight day zero out of soda cans. These are popular with long distance hikers for their lightweight and no moving parts to break. I’ll shoot a couple photos of it in use along the way.
26: small bottle of denatured alcohol as stove fuel.
27: lighter, also not pictured additional lighter. Backup fire source recommended.
28: small cheap camp cook pot I’ve had for 10 years that has been spray-painted black for solar cooking.
29: Cordura hydration bladder, with webbing straps to carry as backpack if long distance water portaging is needed.
30: additional cap for bladder perforated with holes to be used as camp solar shower
31: toothpaste/toothbrush.
32: windshield reflector (Mylar laminated bubblewrap style) cut to box width to be used as sleeping pad, as well as folded into conical shape to set up a solar cook oven with an oven bag.
Couple hours of sleep and tomorrow is time to pedal.